

The QHYCCD PoleMaster is mentioned frequently everywhere astronomers are to be found in the last 2 to 3 years. It has been called everything from handy to revolutionary in making polar alignment much less of a onerous task for many astronomers, especially the ones performing DSO imaging, and even more so for astronomers that don't have a permanently mounted scope. After settings up a new concrete pier and planning to attend StarFest with my scope on a tripod (August 22-26 in Ontario, Canada, in a reasonably close by dark Bortle class 4 area), I finally broke down and picked one up to see how it lived up to the hype. I'm a long-time owner of QHY products and enjoy using them - I had high expectations for the PoleMaster, and I wanted to share my experience using it for the first time, along with preliminary results seen in test images.
The PoleMaster comes in the familiar QHY sturdy metal case that you see housing cameras such as the popular QHY5 cameras. Opening the case reveals good packing with lots of black open-cell foam protecting the contents. It would be hard to imaging the camera being damaged in shipping barring a very serious incident.
The camera comes with a solid metal screw-on dust/storage cover, which is a nice touch - You can leave the PoleMaster permanently attached onto your mount without worrying about dust settling on the lens. Also included are 3 screws for mounting onto either one of the optional mount polar aperture adapters or directly onto your mount if it's supported - Fortunately, my CRUX 200HD does have a built-in mounting bracket designed specifically for the PoleMaster, so in this case I didn't need to pick up an additional adapter (Thanks Hobym!).
Other items found in the case (apart from the camera itself):
- A heavy gauge USB cable with a solid 2 thumbscrew connection for the camera end and regular USB to plug into a laptop etc
- A small lanyard that attaches to the camera dust cover, handy if you have a small hook to hang it from while you're using the camera.
- A very small black allen key was included (Don't drop it in the dark! I have a special zip-lock baggie just for storing this), which sent me into the online user manual to figure out what in the world it was for. A quick read through revealed that it was for releasing the camera from it's housing, allowing it to slide it in and out and thereby changing the camera focus. You will need to unscrew the outer housing of the camera first in order to see the grub screw holding the lens in place. The screw doesn't take much turning to loosen and tighten it. As a number of people have reported, my focus was not set very close upon arrival, and I needed to adjust the focus once I had the software up and running and could see stars
- A helpful laminated card listing support resources for the PoleMaster
You can download the drivers and software here, along with the afore-mentioned user manual. Interestingly, there is support for running the PoleMaster with a Raspberry Pi.
If you're like me and quickly bolted the camera onto the mount without reading the instructions first and assuming the USB cable should point towards the ground when you're slewed to Polaris, you will at some point realize that you have jumped ahead of yourself and will have to take the camera off and mount it properly. "The USB port of the camera should be directed to the left side when you are facing the camera". Words to live by. Likely you can have the camera mounted differently, but it will be a little more difficult to identify stars when doing the alignment.
Once the camera was attached (correctly) to the mount, I installed the drivers (for Windows in my case) and also installed the PoleMaster application from the link above. Not much excitement to see here, everything went smoothly. I plugged the camera into your computer/laptop/Pi and then launched the PoleMaster application. Before going any further I slewed the scope to point at Polaris (anywhere reasonably close by will do).
The application is pretty straightforward, and once you've gone through one alignment, it's very easy to do it again. The first time took me about 15 minutes while checking the manual from time to time, but after that the whole thing can be done in well under 5 minutes.
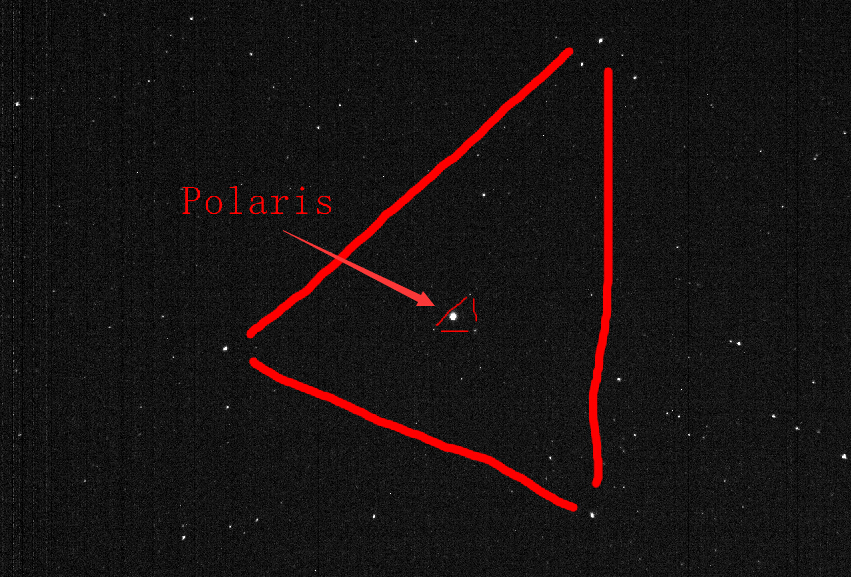
I clicked the Connect button at the top of the application, and saw some faint specs appear on the screen. They were quite dim, so I used the buttons near the top of the app to increase the exposure to the max of 300 ms and turned the gain up to 100. The stars got brighter, and I tried to compare the dots on the screen with the diagram in the manual of how Polaris should appear with it's nearby companions. Hmmmm.... Is that it? No... Are those two stars over there the two close-together stars I'm looking for? Maybe... Can I see a triangle of stars with a bright Polaris in the middle? Not really.
After a few minutes of staring and waiting for the magic picture to pop out of the screen like one of those 1980's 3D pictures, no luck. I started wondering if I had the camera misaligned still and things were rotated. Back to check out the camera. It's at this point that I discovered an important concept that the manual or software does not take into account at all - The camera works far better when you remember to remove the dust cover. In the words of Stan Lee, "Nuff said".
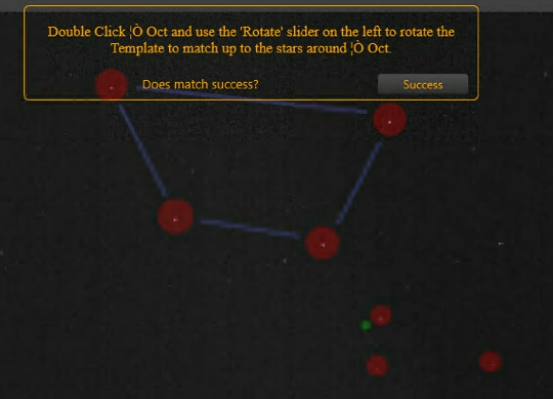
Now that I was seeing real stars and not hot pixels, things picked up quite quickly. The application has a friendly helper section at the top that walks you through the tasks you need to perform, such as double clicking on Polaris and rotating the screen (using a slider control in the application) to place nearby stars into circles drawn on the screen several times during the process - I won't go into all of the step by step details of the alignment, but it doesn't get much harder than this.
The application checked to make sure my RA centre of rotation was on the pole, which is reassuring to watch - A star rotates nicely around the centre of the screen following a green circular line perfectly as the mount slewed in RA.
Next was adjusting the azimuth and altitude to move Polaris into the centre of a small circle on the screen. I wasn't too far off after using PHD recently to get what I had thought was pretty darn good alignment, but I did need to adjust the azimuth and altitude a bit to get it that much more precise that PoleMaster could provide.
At this point I figured I was done, but it turns out this was just the rough polar alignment finished. The helpful Manuel now asked me to to click the Start Monitor button, at which point the PoleMaster software went into a higher resolution "precise polar alignment" mode where it was more sensitive and showed a smaller "zoomed in" screen that allowed for a finer alignment by moving a small green square into the middle of a small red circle.

Now a small hurdle was uncovered - when locking the azimuth and altitude levers, I realized that the locks on the mount made the mount move slightly in both RA and DEC when engaged, so that when I had things centred and then locked it up, the mount was pushed slightly out of alignment (about 1/3 off the centre of the screen above). I suspect that this could happen to many different mount types, depending on the design, and once you know about it, it's not hard to work around. After a little fiddling I was able to position the green square off-centre so that when the locks were engaged the square moved to the red circle. It worked best leaving both locks disengaged and locking one and then unlocking it and locking the other until you had the green square exactly where I needed it to be after both locks were engaged.
All done!
Just for kicks, I started the whole process again to see what the result would be. It went much much faster this time, and the result was that the alignment was extremely close, just a tiny nudge to the altitude had it showing the green square exactly centred on the red circle.
So. Now that that was done, what was the result? Did it help at all? There's really only one test that matters - taking pictures and see what happens.
I examined some images before and after using the PoleMaster to see if there was any difference. Below are two images zoomed in 400% (in Nebulosity) on bright stars from the edge of images (this is where you would see the most effect of poor polar alignment). I didn't try to move the scope to positions where the alignment would be more extreme, I took images of targets that are likely to be commonly imaged objects. No processing was done on the images apart from a pass with DDP to bring out the objects better. They are both 15 minutes of imaging 5 minute subs and aren't really pretty pictures on their own without a lot more integration.
This first image was the Dumbbell Nebulae (which was centred and out of view in this snippet), taken before using PoleMaster, but after using PHD for drift alignment. Using PHD, I'd ended up taking about an hour to try to do the best job I could, I believe it ended up reasonable close to aligned. It was decent seeing with a quite night. Note although the stars aren't tracking badly, they do have a small telltale egg shape that indicates image rotation caused by polar alignment not being exact. This can be caused by optics in the scope among other things, but I have a pretty flat field scope (Meade 12" ACF) and don't normally see issues near the edge. If I had spent longer periods with PHD it's possible I could have gotten better results, but that's getting into a serious time commitment, which is exactly what the PoleMaster is about - Reducing setup and alignment time so that you can get to the good stuff faster.

The second image snippet was near the Ring Nebula, taken on a night with poorer seeing in the same location of the CCD as the above image (but not the same group of stars) - you can see that the stars were jumping around and scintillation was causing smears are sparkles - the air was very humid, which didn't help. It's a noisier image. But even so the star shape is superior to the stars in the picture above. The stars are much rounder and don't look too eggy.

Over I have to say the whole process spent with the PoleMaster was enjoyable and simplified so that anyone could get through the alignment process and end up with an excellent polar alignment in very short order. I'm happy to own one and would recommend them to anyone who wants to have a fast, good polar alignment. QHY definitely hit on an area that was ready for technological improvement and followed through with a very solid product.
Full Disclosure: I'm an owner of Telescopes Canada and carry many QHY products in our catalog, including the PoleMaster